Despite being off-grid, there are certain luxuries that only come with fossil fuels or electric power. Consider the time required to chop a tree down vs using a chain saw, or building a fire to cook versus an electric kettle. Lamp oil versus bright LED bulbs; the list goes on. For me, the off-grid retreat was meant to be a place to relax (eventually, not yet), and camping is pretty intensive. So I decided to work on producing electricity to make certain things easier, and to have other luxuries such as music or TV.
When I was first scoping out power production requirements, I was doing it with a travel trailer in mind. Putting the solar cells on the roof and boondocking. However, absent a travel trailer, I am now using those same solar cells and battery pack up on the mountain.
Currently, I use a very minimal amount of electricity out on the mountain, but moving as much as possible over to electric seems like the best way to go. It means less trips for hauling gasoline or diesel, and it also means less interruption because its produced onsite. However, using grid tied electricity has a monthly cost that was unappealing for the amount I was going to use it. It is time to go solar.
Full disclosure: I had no idea how to do this when I first started studying this about two years ago. It seems simple, right? Solar panels…. electricity. done! Anything that isn’t fully understandable at first glance must be easy or magic. Right? No. There is a whole lot of planning that goes into this as well. This post is designed to be part 1 of 2 posts, and this is designed to cover a lot of the components required to make solar work.
Solar Basics
In my mind there are basically 5 things required to make solar work, and 4 more things to make it legal:
- Solar panels for power generation
- A charge controller to regulate how much power is sent to the batteries
- Batteries to store and draw power from
- A DC to AC and/or DC to DC power inverter to draw power from the batteries and convert it into a useful form (I have both on my system right now)
- Wires to connect all the parts – Generally really thick ones… more on this later.
That’s all you need to make it work, but to be legal you also may need:
- Electrical grounding rods
- Conduit to protect the wire
- Breakers to protect the system
- Permits – because of course
For the purposes of what I am doing, I am focusing on what it takes to get it up and off the ground (aka, the first five things). This project is currently in experimentation mode and learning phase (aka, I hope the electronic magic smoke doesn’t escape the device I am working with). Nothing I am building is permanently built nor considered stable.
Quick Math Talk
Just a quick math and electrical reminder: this post will talk in watts, volts, and amps in this blog entry, and the next solar one. I like to talk in watts, which is in the unit of power. Then I don’t have to talk about what voltage, or amps. For the purposes of this post:
Watts = Volts * Amps
1500 watts = 12 volts * 125 amps
1500 watts = 24 volts * 62.5 amps
1500 watts = 110 volts * 13.63 amps
Solar Panels
So when I started building the solar panels, I wanted to be able to generate a considerable amount of power quickly as there may only be limited times I could get sun due to tree shade on the travel trailer. But while researching, I also quickly learned that there are quite a few half-truths in solar generation. Everything that is listed, isn’t exactly true all the time. Here are a few things I picked up:
- Everything is measured in laboratory ideal conditions…. yea, thats not going to happen in the real world.
- Summer conditions are ideal. Winter is terrible.
- During the summer there is so much sun exposure that the sun rises behind the panels, and sets behind the panels (aka, more than 180 degrees). You can’t use a fixed solar cell panel to capture ideal conditions. You could build a heliostat to get maximum sun, but it might just be cheaper to get another solar panel to improve power. On the flip side, you are getting 14 hours of strong sun.
- During the winter, the sun rises and sets in front of the solar panel. However, due to the low angle of the sun it has less power as there is more atmosphere to fight through, and there are only 10 hours of sunlight a day.
- Solar panels come in monocrystalline and polycrystalline. Monocrystalline is much more efficient, but polycrystalline is much cheaper. I have 12 acres of land, I went with the cheaper. Note: thin film also exists, but its not a mature enough technology yet for any consumer application.
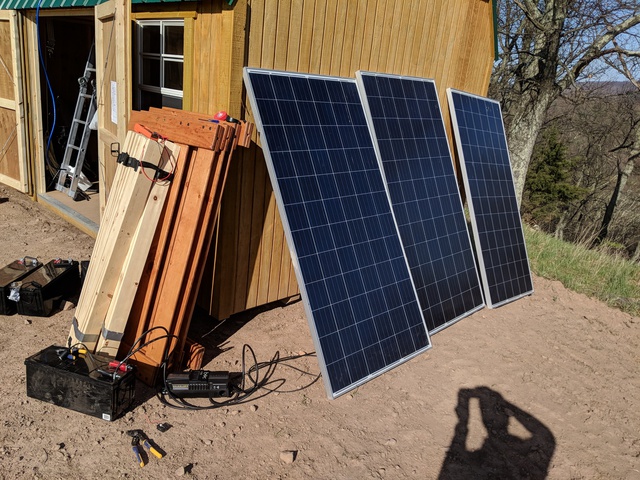
I bought three Renogy 320w 24v solar panels, but I have no idea why they are called 24v. The Optimum Operating Voltage (Vmp) is 38.16V, while the Operating Current (Imp) is 8.38A (aka, 320 watts). When I wire the three solar panels in series, I should be around 115 volts, but in reality I have already observed 122 volts. This means I would have a theoretical optimum maximum production of 960 watts (but may be closer to 1022 watts). The I would link to this panel, but unfortunately, it appears they are no longer made by Renogy (or at least they are no longer on their page).
At the time the three panels cost $851.97. That is about 88¢ per watt of production. The largest polycrystalline panel that Renogy currently offers is 97¢ per watt of production. I purchased mine in 2017, and I don’t know if the increased prices are due to solar tariffs.
Now getting them delivered, well, they had to be shipped freight. They day I departed my job, was the day that they decided to show up, so I have actually owned my solar panels longer than I owned my slice of the mountain. The team at XPO made this really easy for me, and I was pretty pleased.


These… aren’t small. Standing about 6’5″ tall and 40″ wide (195 cm x 101 cm), they do taking effort to safely move about. And they aren’t exactly light either, at 50 pounds (22.5 kg) each. That said, the idea is to get them out there producing power and not moving them about.

Charge Controllers and Inverters
There are three different ways to charge your batteries (well, that I will discuss here at least, hydro, wind, and mr. fusion won’t be discussed in this post):
- Tied to the grid (shore power)
- Tied to a generator
- Solar power
Unfortunately, you just cannot tie an electrical wire directly into the grid and juice up the batteries. Off-grid solutions commonly run 12, 24, or 48 volt DC power configurations because of the batteries that are key to providing power operate only in lower voltage DC. While 12 volt is most common, you can save wiring costs by running at higher voltages, which require smaller cables. Also, the power you receive is never in the proper configuration required to safely charge your batteries. AC power can’t work on DC power which batteries need. Solar power may be DC, but generally the voltages are too high to be connected to batteries directly.
Using a charge controller converts the power from the current format that you have it in, into the optimal way to charge the batteries. Note: you do not run solar power directly into AC power, as batteries are a required middle step. Inverters take the power that is available to you (such as battery power) and converts it into something useful such as AC power for your gadgets, or into another DC voltage for your phone or tablet.
The original plan for my solar cells were to put them on top of a RV, so having an inverter charger was the original idea. By doing that, I could not only charge the batteries via the grid or generator, but also draw power from the batteries when needed. Because they were going to go into an RV, I also wanted to do a 12v system which is more common in automotive environments. I am continuing to build and configure with a 12v inverter charger, but this will be changed in the future when I move to a 24v configuration. At that time, the 12v inverter charger will be changed to 24v inverter only (one given to me by my dad over Christmas).

Inverter chargers are great for boats and recreational vehicles (RV) because when you plug in the device to the established electrical grid or generator, it can provide power and charge the batteries at the same time. When you get to a campground or dock with power, you plug in the inverter charger to the grid and it provides power to your recreational vehicle, or boat. If you lose power or depart, you can still draw off the batteries via the inverter charger. The boat or RV has permanent wiring run for all the needs, and for the places of convenience. So you have fixed electrical, such as a refrigerator, but also open outlets to plug in a laptop at a table, or couch, etc. However, the wiring doesn’t change because you are using the grid instead of the batteries. With the inverter charger, you have ability to feed power to the boat or RV wiring from the batteries or the grid, from a single location.
Inverters can only generate a limited amount of power from the batteries, however they are offered in various sizes based on expected needs. The blue inverter charger I am using can generate about 2000 watts, while the inverter can generate about 2500 watts. That is quite a bit of sustained load, and would drain my batteries in just a few hours. Anything requiring that much sustained load over an hour would probably have me plugging it directly into a generator.
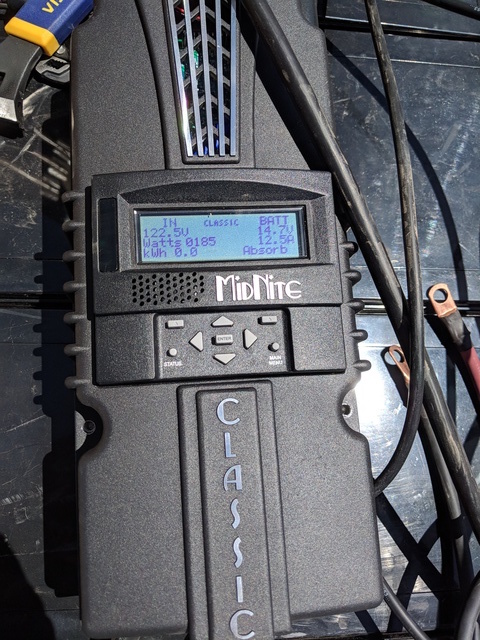
But what about solar power? Unfortunately, you need a separate charge controller for solar power. As the other inverter handles only AC power, you will need another charge the batteries via DC power from the solar panels. For my panels, the voltage will fluctuate with the amount of sun coming in. If it is early in the morning, or late at night, I may only get 20 volts, but during midday and its sunny, it could go to nearly 150v. The solar charge controller will take that variable input, and output to the batteries a constant 14 volts by may adjust the amount of amps being delivered. Also nice, is that when the batteries are full, it cuts the power generation back and just gently tops off the batteries to make sure they are ready to go when filled.
I bought the 200 MidNite Solar Classic to handle my solar charge controller requirements. This charge controller is MPPT, which is more efficient than on that is PWM based (technical details here). The 200 in the number (which wasn’t clear to me when I bought it) refers to the maximum number of volts it can accept. It then spits out the appropriate number of volts and amps based on your battery configuration (mine is currently in 12 volts), and by how much power it needs. With my current maximum volts of 122, I could add on a fourth panel for solar generation (but I doubt I will need it).
What if you want to use two different charge controllers? Whats great is that you can if they are hooked up in parallel. The voltage wont change, but the charge from two different sources may increase the amps. Batteries will generally fluctuate around 12 volts based on how fully charged they are (some times more than 12 volts, some times less). However, if one of the charge controllers boosts the voltage to 14 volts, it won’t impact the other inverters or chargers. If both charge controllers want to charge at the same, they will. So yes, you could do shore power and a generator at the same time (but operating solar would obviously be cheaper).
Batteries
Batteries are critical because you need to store power and use it on demand. While this seems obvious for using solar power at night, whats less obvious is when you are using an appliance that requires more power than what solar can generate even at mid day. For example, a hot water kettle requires 1303 watts of power to boil water. If you are generating 800 watts of solar, you will need to draw the other 500 watts off the batteries until its done heating up.
Battery sales are confusing. There is lots of different technologies out there, all based on different chemistry and configurations but lets start with some basics.
Capacity is what most people care about, but they don’t come right out and say what the capacity is in watts. You will generally see battery sold by:
- Volts (6, 12, and 24 volt batteries are common)
- Amp Hours
In our water kettle example above, we know it takes about 1300 watts to boil the water, but thats an instantaneous amount. When you buy power from the grid, they charge you the access fees, taxes, etc, but bill you by the kilowatt hour (kWh). So if you ran the kettle for a full hour, it would 1.3 kWh, or 1300 watt hours (Wh). However, it doesn’t take a full hour to boil the water. To boil 1 liter of water it takes about 4 minutes, 10 seconds (4.15 minutes) from room temp. So mathing this:
Wh = Watts * Hour

Wh = 1300 Watts * 4.15 minutes

Wh = 1300 Watts * (4.15 minutes / 60 minutes)

Wh = 1300 Watts * 0.069 hours

Wh = 89.9
Or roughly 90 watt hours. So when sizing how much battery capacity you want to have, you really need to know how many Watt hours you would like to have. Personally, I find that once solar power is setup, its cheaper to operate than say… lamp oil, propane, or other fuels. So I purchased four larger batteries.
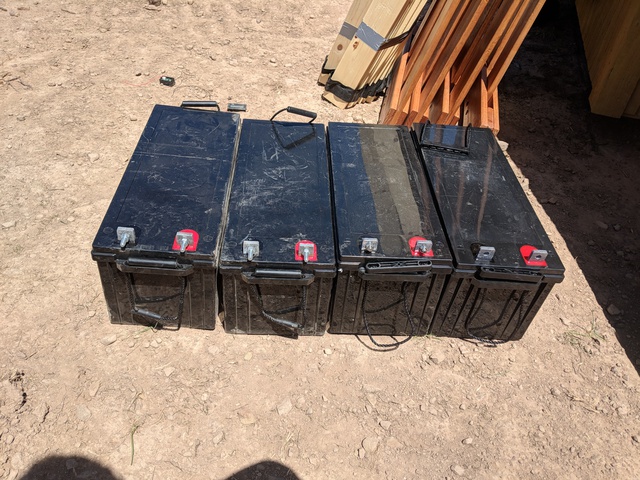
I purchased my four batteries (staggered over some time cause they are expensive) from amazon. When you purchase batteries, they should be identical in all ways. Same battery, same manufacturer, same everything. Not doing this, will make the batteries fail sooner because the batteries will have to work harder or less based on electrical load and the chemistry inside, despite nearly being identical. The batteries I wanted purchased were rated as 12 volts, and 200 amp hours (ah) each. Each battery says its 112 lbs each (but I think they are lighter than that). So, four batteries would be:
Wh = 4 * (12 * 200)

Wh = 4 * (2400)

Wh = 9600

kWh = 9.6
Thats a lot of power! But you don’t get all of it because…
Chemistry is an important part of your batteries. Chemistry is what determines your depth of discharge (or how much battery you can use). Some chemistry can allow you to use all of your capacity, while other may only allow you to use 50%.
Common chemistry found right now include:
- Traditional (think car) lead acid – Avoid. These batteries are designed only to produce a large amount of power quickly to start a car, but can destroy themselves after only 15 full discharges. Heavy.
- Deep cycle (think golf carts) lead acid – These batteries are fairly cheap and plentiful. The depth of discharge can go down to about 50%. So while you can acquire these cheap, and you can maintain them, you only get about 50% capacity without risking damage. Heavy.
- Absorbent Glass Mat (AGM) – These are sealed lead acid batteries which were designed for the military. These batteries are designed to be similar in technology to the lead acid batteries, but manufactured to ensure that they are spill proof, and do not require hazardous material markings. However, because they are sealed, they cannot be maintained and will need to be disposed sooner than deep cycle batteries. However, you can discharge them down to 80% giving you more capacity.
- Lithium Ion – The gold standard. Lightweight, great depth of discharge, can take abuse. However, costs 8 times the amount of other batteries making them cost prohibitive.
- Salt Water Batteries – A new technology that came to market in 2017… but is struggling. There is not enough information to judge these at this time. Could be interesting when its time for me to replace my current batteries.
I went with AGM batteries. I wanted something that I could easily and safely transport, at a reasonable cost. And getting in there to maintain the batteries wasn’t something I wanted to do in an off grid retreat that I would only be spending some of my time at. I know that they will need to be replaced in 5 years, but thats an okay one time cost.
Wires
Wires of all sorts are required to get this working… and even more connectors. But here is what you need to know: the lower the voltage, the thicker the cable you need to run. The thicker the cable, the greater the cost. Additionally, the longer the cable, the lower the voltage (due to resistance), and increased costs. So ideally, running high voltage is the best, over short runs.
For the batteries, I made my own cables because I wanted them a certain size and uniformed length. While I am operating at 12v, they are working pretty well mainly because the short lines. When I move to 24v, they will operate even better. Here are a few pictures of me making my own cables. For this task, I used 4 AWG wire in red (positive) and black (negative).


If its not clear whats going on in the last few pictures, I added a bit of heat shrink tubing around the wires to prevent accidental touches of wires. I shrunk them using the heat of the wood stove. Trust me, minimizing the amount of exposed metal is good becausewhen the wires accidentally (or even intentionally) touch the sparks are blinding and scary.
Some of the solar wiring came from Renogy, but other parts of it I made myself. Solar wiring uses a kind of a unique quick connect system that I like but I had never used before. Adding the connectors to the wires was actually easier than making your own network cables.

Conclusion of Part I
Okay, this a really long post and I am going to stop this here. But hopefully, I have gone over some of the components that make solar work, and given you some ideas. In the next post I will show you how I assembled all this, and started generating power.
